2019年10月8日星期二

Xhorse Condor XC-MINI Plus Calibrate Clamp and Cutting

When do you need to calibrate the Xhorse Condor XC-Mini II? How to calibrate? These are the questions that must be considered before cutting keys.

When to calibrate Condor XC-Mini Plus?
1.After receiving a new machine or after using it for a period of time, recalibrate the machine to ensure the accuracy of the machine;
2.If you reset the distance between the probe and the milling cutter, all fixtures need to be recalibrated;
3.The values ​​of the machine may be different. After replacing the motherboard or upgrading the firmware, please re-execute the calibration process.

Note: Make sure to clean the fixture and keep the fixture clean no debris

How to calibrate?

-Adjust high level
Step 1: Open Condor XC-MINI Plus tablet
Enter main interface and click on 'Self Test'.
condor-xc-mini-plus-calibration-1
Step 2: Click on 'Height Level Adjustment
condor-xc-mini-plus-calibration-2
Step 3: Adjust the height of cutter and probe by following the tips on the screen, then click on 'Continue' to the step of adjustment
condor-xc-mini-plus-calibration-3
Step 4: After machine stopped, follow the screen tips to adjust the probe, let it at same height with cutter, then 'Continue'
condor-xc-mini-plus-calibration-4
Step 5: Select the correct diameter of cutter and confirm it
condor-xc-mini-plus-calibration-5

-Calibrate clamp
Step 1: Enter Condor XC-MINI II main interface
Select ' Self Test' -> 'Clamp Calibration'
condor-xc-mini-plus-calibration-6
condor-xc-mini-plus-calibration-7
Step 2: Select clamp M1 and proceed by following the tips on the screen
condor-xc-mini-plus-calibration-8
Step 3: Please put the HON66 key blank according to the screen, then tighten the clamp, click on 'Continue', calibration finished
condor-xc-mini-plus-calibration-9
Step 4: Enter clamp M2 calibration, rotate side A upward and do not put any keys on the clamp
condor-xc-mini-plus-calibration-10
Step 5: Follow the tips on the screen, rotate side B, C, D upward one by one to calibration until M2 clamp calibration finished
condor-xc-mini-plus-calibration-11

- Calibrate cutting
Step 1: Enter main interface
Click on 'Self Test'-> 'Cutting Calibration'
condor-xc-mini-plus-calibration-12
condor-xc-mini-plus-calibration-13
Step 2: Operate by following the tips and click on 'Continue'
condor-xc-mini-plus-calibration-14
Please kindly notice:
Please use new key blank, used HON66 will not working for cutting calibration
Step 3: Clean the cutter/probe/clamp cutting area by brush
Then click on 'Continue' and calibration has finished

That’s all! Hope it helps you!
http://www.obdiitool.co.uk/wholesale/xhorse-condor-xc-mini-plus-key-cutting-machine.html

Source:http://blog.obdiitool.co.uk/xhorse-condor-xc-mini-plus-calibrate-clamp-and-cutting/

2019年10月7日星期一

How to Read and Write N13 ISN by Updating CGDI BMW Authorization

The previous article has introduced two ways to read and write N13/N20/N55 ISN by CGDI prog BMW without opening the DME shell. The easier way is to obtain the CGDI BMW authorization. But some customers also don’t know how to use when getting the authorization.
Here share the relevant guide to the CGDI device owners.
cgdi-bmw-read-n13-isn-authorization-1


The method to read/write N20, N55 and B38 is same as N13, here take N13 as an example.

Preparation:
DME Model: BMW N13
Device: CGDI BMW programmer+ N13 read ISN authorization
One professional OBD cable made by CG Company which is special for reading and writing DME ISN
cgdi-bmw-read-n13-isn-authorization-2


Procedure:
Follow the wiring diagram in the CGDI BMW software
cgdi-bmw-read-n13-isn-authorization-3

Connect 12V, CAN-L and CAN-H, GPT-0, GPT-1 and GND cables in order
cgdi-bmw-read-n13-isn-authorization-4

Supply 12V power to CGDI BMW device, and ensure network connection
Go to CGDI BMW software
Click on “N13/N20/N55/B38 read ISN”
cgdi-bmw-read-n13-isn-authorization-5


Select “N13” chip and click “OK”
cgdi-bmw-read-n13-isn-authorization-6

There are 5 options in the main menu: Wiring Diagram, Identify, Read ISN, Write ISN and Back
cgdi-bmw-read-n13-isn-authorization-7

Click on “Identify”
Read out the chip name, ISN and hardware ID
cgdi-bmw-read-n13-isn-authorization-8

Click on “Read ISN”
Reading DFLASH…
Read DFLASH and ISN successfully
cgdi-bmw-read-n13-isn-authorization-9

Copy the ISN
Click on “Write ISN”
Read DFLASH success
cgdi-bmw-read-n13-isn-authorization-10

Save DFLASH data
cgdi-bmw-read-n13-isn-authorization-11

Backup data success
Paste the ISN has been read
To distinguish the ISN from the original one
Change the last two digits to “88”, and click on “OK”
cgdi-bmw-read-n13-isn-authorization-12

Write ISN success
cgdi-bmw-read-n13-isn-authorization-13

Click on “Read ISN” again
Confirm CGDI Prog BMW key programmer write N13 ISN successfully
cgdi-bmw-read-n13-isn-authorization-14

Two ways to read N13/N20/N55 ISN without opening the DME shell
Reference:
http://blog.obdiitool.co.uk/cgdi-bmw-read-n13-n20-n55-isn-without-dismantling-dme/
The place to get the CGDI BMW authorization:
http://www.obdiitool.co.uk/wholesale/cgdi-bmw-read-isn-license.html

Thank you!


Source:http://blog.obdiitool.co.uk/read-and-write-n13-isn-by-cgdi-bmw/

4 Ways to Cut Key by Xhorse Condor XC-MINI Plus?

Compared with other Xhorse key cutting machines, Xhorse Condor XC-MINI Plus is the best choice to use. With the adjustable screen and larger dust cover & bottom tray, be more friendly and safer to use. Besides that, it can cut keys faster and supports both online and offline update. This article will highlight the guides including:


Lets’ go one by one.

How to use the key database?
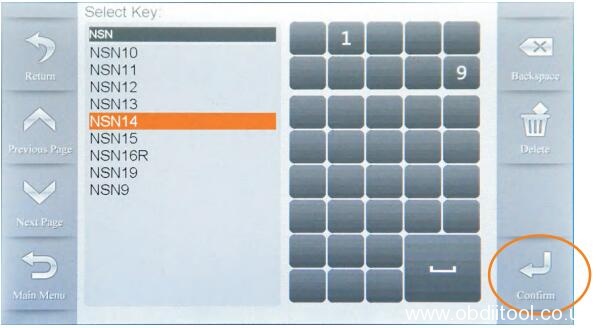
Three ways to make keys from the key database
1.Customers provide key code
2.Some car keys have key code information on lock
3.Other ways to get key code

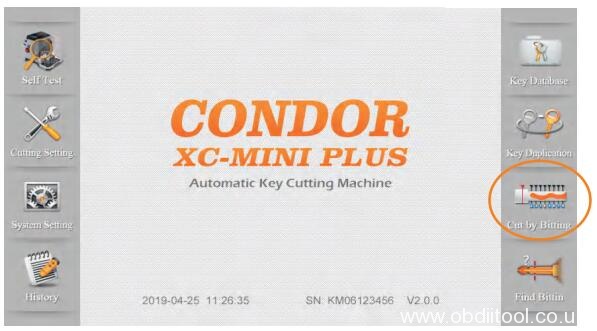
Step 1: Enter Condor Mini plus main menu
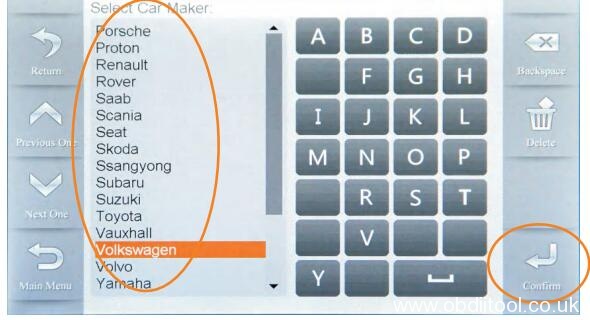
Click on ‘Key Database’ and select or input car maker
xhorse-condor-xc-mini-plus-cut-key-1

xhorse-condor-xc-mini-plus-cut-key-2

Step 2: Enter the key code (the key code is printed on the lock for some cars)
Then click ‘Confirm’
xhorse-condor-xc-mini-plus-cut-key-3

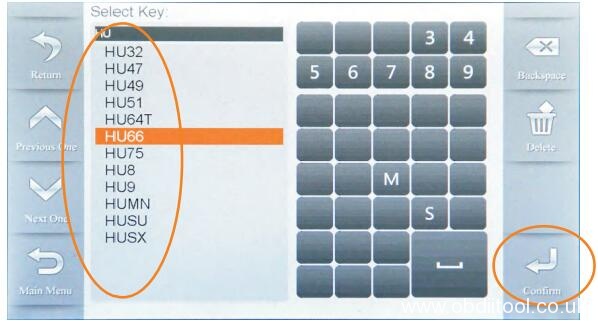
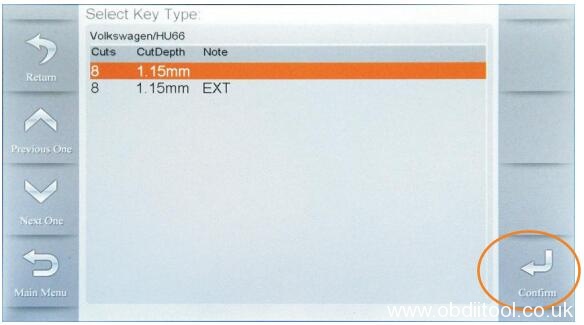
Step 3: Select the key series and click ‘Confirm’
xhorse-condor-xc-mini-plus-cut-key-4

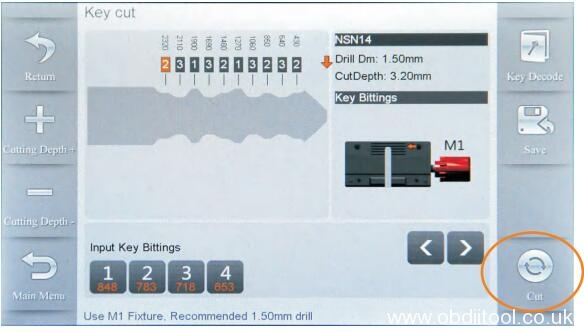
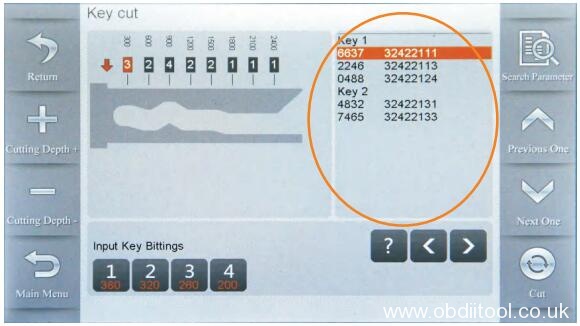
Step 4: The key bittings will be automatically generated and shown on the screen
Then click ‘Cut’ to cut
xhorse-condor-xc-mini-plus-cut-key-5


How to use key duplication?
Car models and years are needed for key duplication
Step 1: Select ‘Key Duplication’ to enter the car maker
xhorse-condor-xc-mini-plus-cut-key-6

Step 2: Select the car maker, model and year
xhorse-condor-xc-mini-plus-cut-key-7

xhorse-condor-xc-mini-plus-cut-key-8

xhorse-condor-xc-mini-plus-cut-key-9

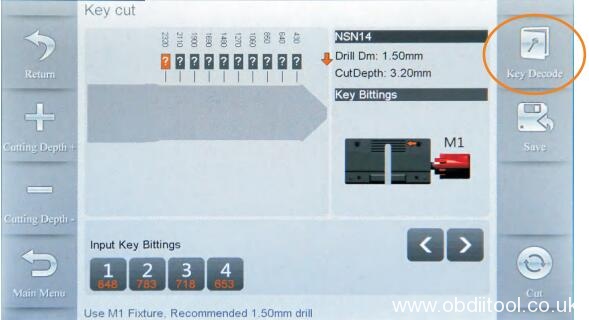
Step 3: Follow the tips on screen and correctly put the key on the clamp, click ‘Key Decode’
xhorse-condor-xc-mini-plus-cut-key-10

Step 4: After decode successful, click on ‘Cut’
xhorse-condor-xc-mini-plus-cut-key-11


How to use universal type?
There is no need that customers know the exact flat, space and other values for the key, just duplicate same shape as original key, then cut key with Condor Mini Plus.

Instructions:
Step 1: Click on ‘Key Duplication’-> ‘Universal Type’
xhorse-condor-xc-mini-plus-cut-key-12

xhorse-condor-xc-mini-plus-cut-key-13

Step 2: Select key type according to original key
xhorse-condor-xc-mini-plus-cut-key-14

Step 3: Take ‘4 Track Internal’ keys for an example
xhorse-condor-xc-mini-plus-cut-key-15

Step 4: According to above information put the key into proper position, keep the key /probe/ clamp clean and with good electrical conductivity, then click on ‘Confirm’
xhorse-condor-xc-mini-plus-cut-key-16

Step 5: Select proper clamp, then click on ‘Decode’ probe will be detected many different points of whole key
xhorse-condor-xc-mini-plus-cut-key-16

Step 6: After decode key successful, click on ‘Cut’, wait until cutting complete.
xhorse-condor-xc-mini-plus-cut-key-18

Note: For other key types also use same steps

How to use cut by bitting?
There are two ways of using cut by bitting function, with original key or without original key. Method 1 for making keys without the original key.
Two ways to getting the key bitting: Use some special tool to get the key bitting or remove the lock to read the key bitting on each wafer.
Step 1: Enter Condor XC-MINI II main menu
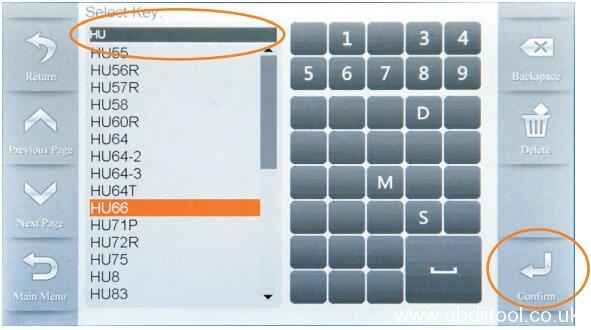
Click ‘ Cut by Bitting to select the key blank type and click on ‘Confirm’
xhorse-condor-xc-mini-plus-cut-key-19
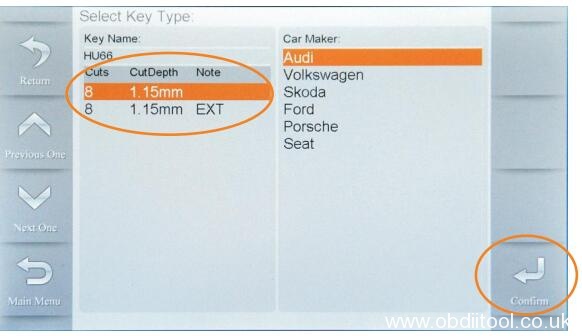
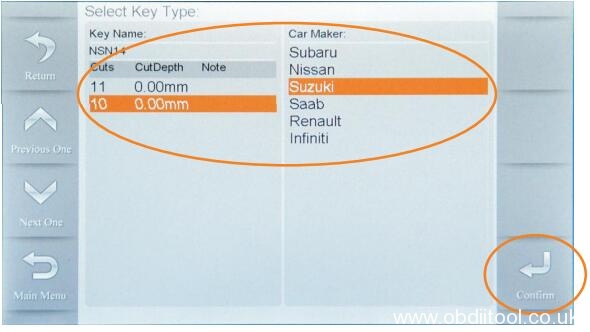
Step 2: Select the key type and click on ‘Confirm’
xhorse-condor-xc-mini-plus-cut-key-20
xhorse-condor-xc-mini-plus-cut-key-21
Step 3:
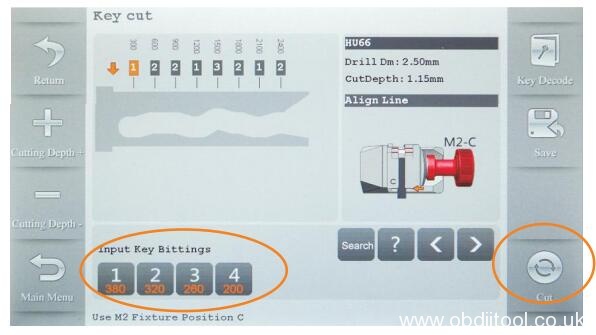
Fix the key according to the picture show, select correct side of clamp and fix the key in correct position
Enter key bitting and check all the information before you click on ‘Cut’ for cutting keys
xhorse-condor-xc-mini-plus-cut-key-22

Method 2 for making a key with the original key:
Step 1: Click ‘ Cut by Bitting’ to select the key type
xhorse-condor-xc-mini-plus-cut-key-23
xhorse-condor-xc-mini-plus-cut-key-24
Step 2: Click on ‘ Key Decode ‘ to get the key bittings
xhorse-condor-xc-mini-plus-cut-key-25
Step 3: Put the new blank key to the correct position and click on ‘ Cut ‘ for cutting keys
xhorse-condor-xc-mini-plus-cut-key-26

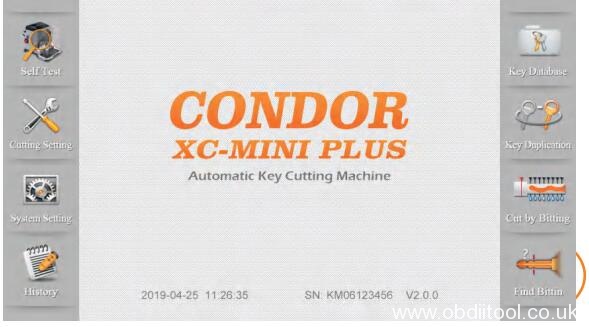
How to use find bitting?
Parts of the cars are missing bitting on door lock/trunk lock if compane with ignition lock. Users can find out the unknown bitting and replace the unknown bitting as”?”

Step 1: Click on ‘Find Bitting’ on Condor XC-MINI II tablet
xhorse-condor-xc-mini-plus-cut-key-27
Step 2: Select a car maker or put in the initial letter of the car maker, then click on ‘Confirm’
xhorse-condor-xc-mini-plus-cut-key-28
Step 3: Select or enter key type and click on ‘Confirm’
xhorse-condor-xc-mini-plus-cut-key-29
Step 4: Select key type and click on ‘Confirm’
xhorse-condor-xc-mini-plus-cut-key-30
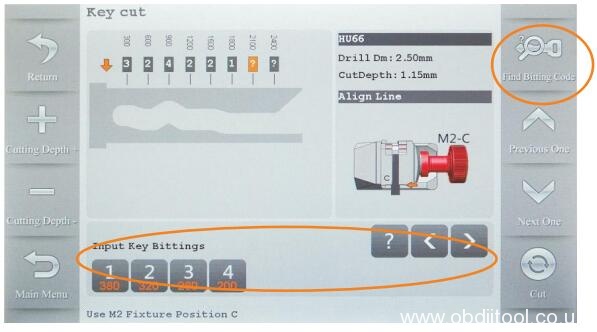
Step 5: Enter the known bittings, if the bitting is unknown, enter ‘?’ as replace then click on ‘Find Bitting Code’
xhorse-condor-xc-mini-plus-cut-key-31
Step 6: Machine will show all possible results, just try one by one to cut keys until it works
xhorse-condor-xc-mini-plus-cut-key-32
That’s all!

Free download HHTWIN Loader: tested in Win7 32bit & Chinese SDConnect

Firstly, thanks to @Azzatec for making this program, he claimed he was not responsible for any damage. The program he wrote just grabs the parameters it gets from DAS, prints them out to a console and starts HHT Standalone with it. It closes after HHT is terminated.

He used this on his car and it works with XDOS 07.2018 on 32bit Windows 7 and a Chinese SD Connect clone (for example:
-Backup your files before replacing stuff…
-This is only intended for systems where HHT hasn’t been integrated yet.
-The HHT folder and hht_call.s are just repacks from this thread: https://mhhauto.com/Thread-HHT-in-WINDOWS-64bit
Credits go to the user pesona.
He just edited HHTWin.INI a little bit.
How to use:
1. Copy the HHT folder to C:
2. Replace hhtcall.s in …\DAS\trees\pkw\programm\hht_link
3. Copy the files from hhtwin_start to …\DAS\bin
4. Edit HHTWin.INI to your needs (it’s preconfigured with SLAVE=PARTT for SDConnect)
Known problems:
-If the computer is not connected to the multiplexer you might get some DLL error and have to close HHT manually.
-When HHT closes StarDiag doesn’t jump back automatically, you have to hit F1
There is no password, download is for free.

Thanks

Source:http://blog.obdiitool.co.uk/free-download-hhtwin-loader/